• Welcome
  • Book
  • Classes
    • Recipes
    • Index
  • Writing
  • Press
  • Shop
  • Contact
Menu

Sonya Michelle Sanford

  • Welcome
  • Book
  • Classes
  • Recipes
    • Recipes
    • Index
  • Writing
  • Press
  • Shop
  • Contact

Okonomiyaki for Hanukkah

December 5, 2017

As written for THE NOSHER

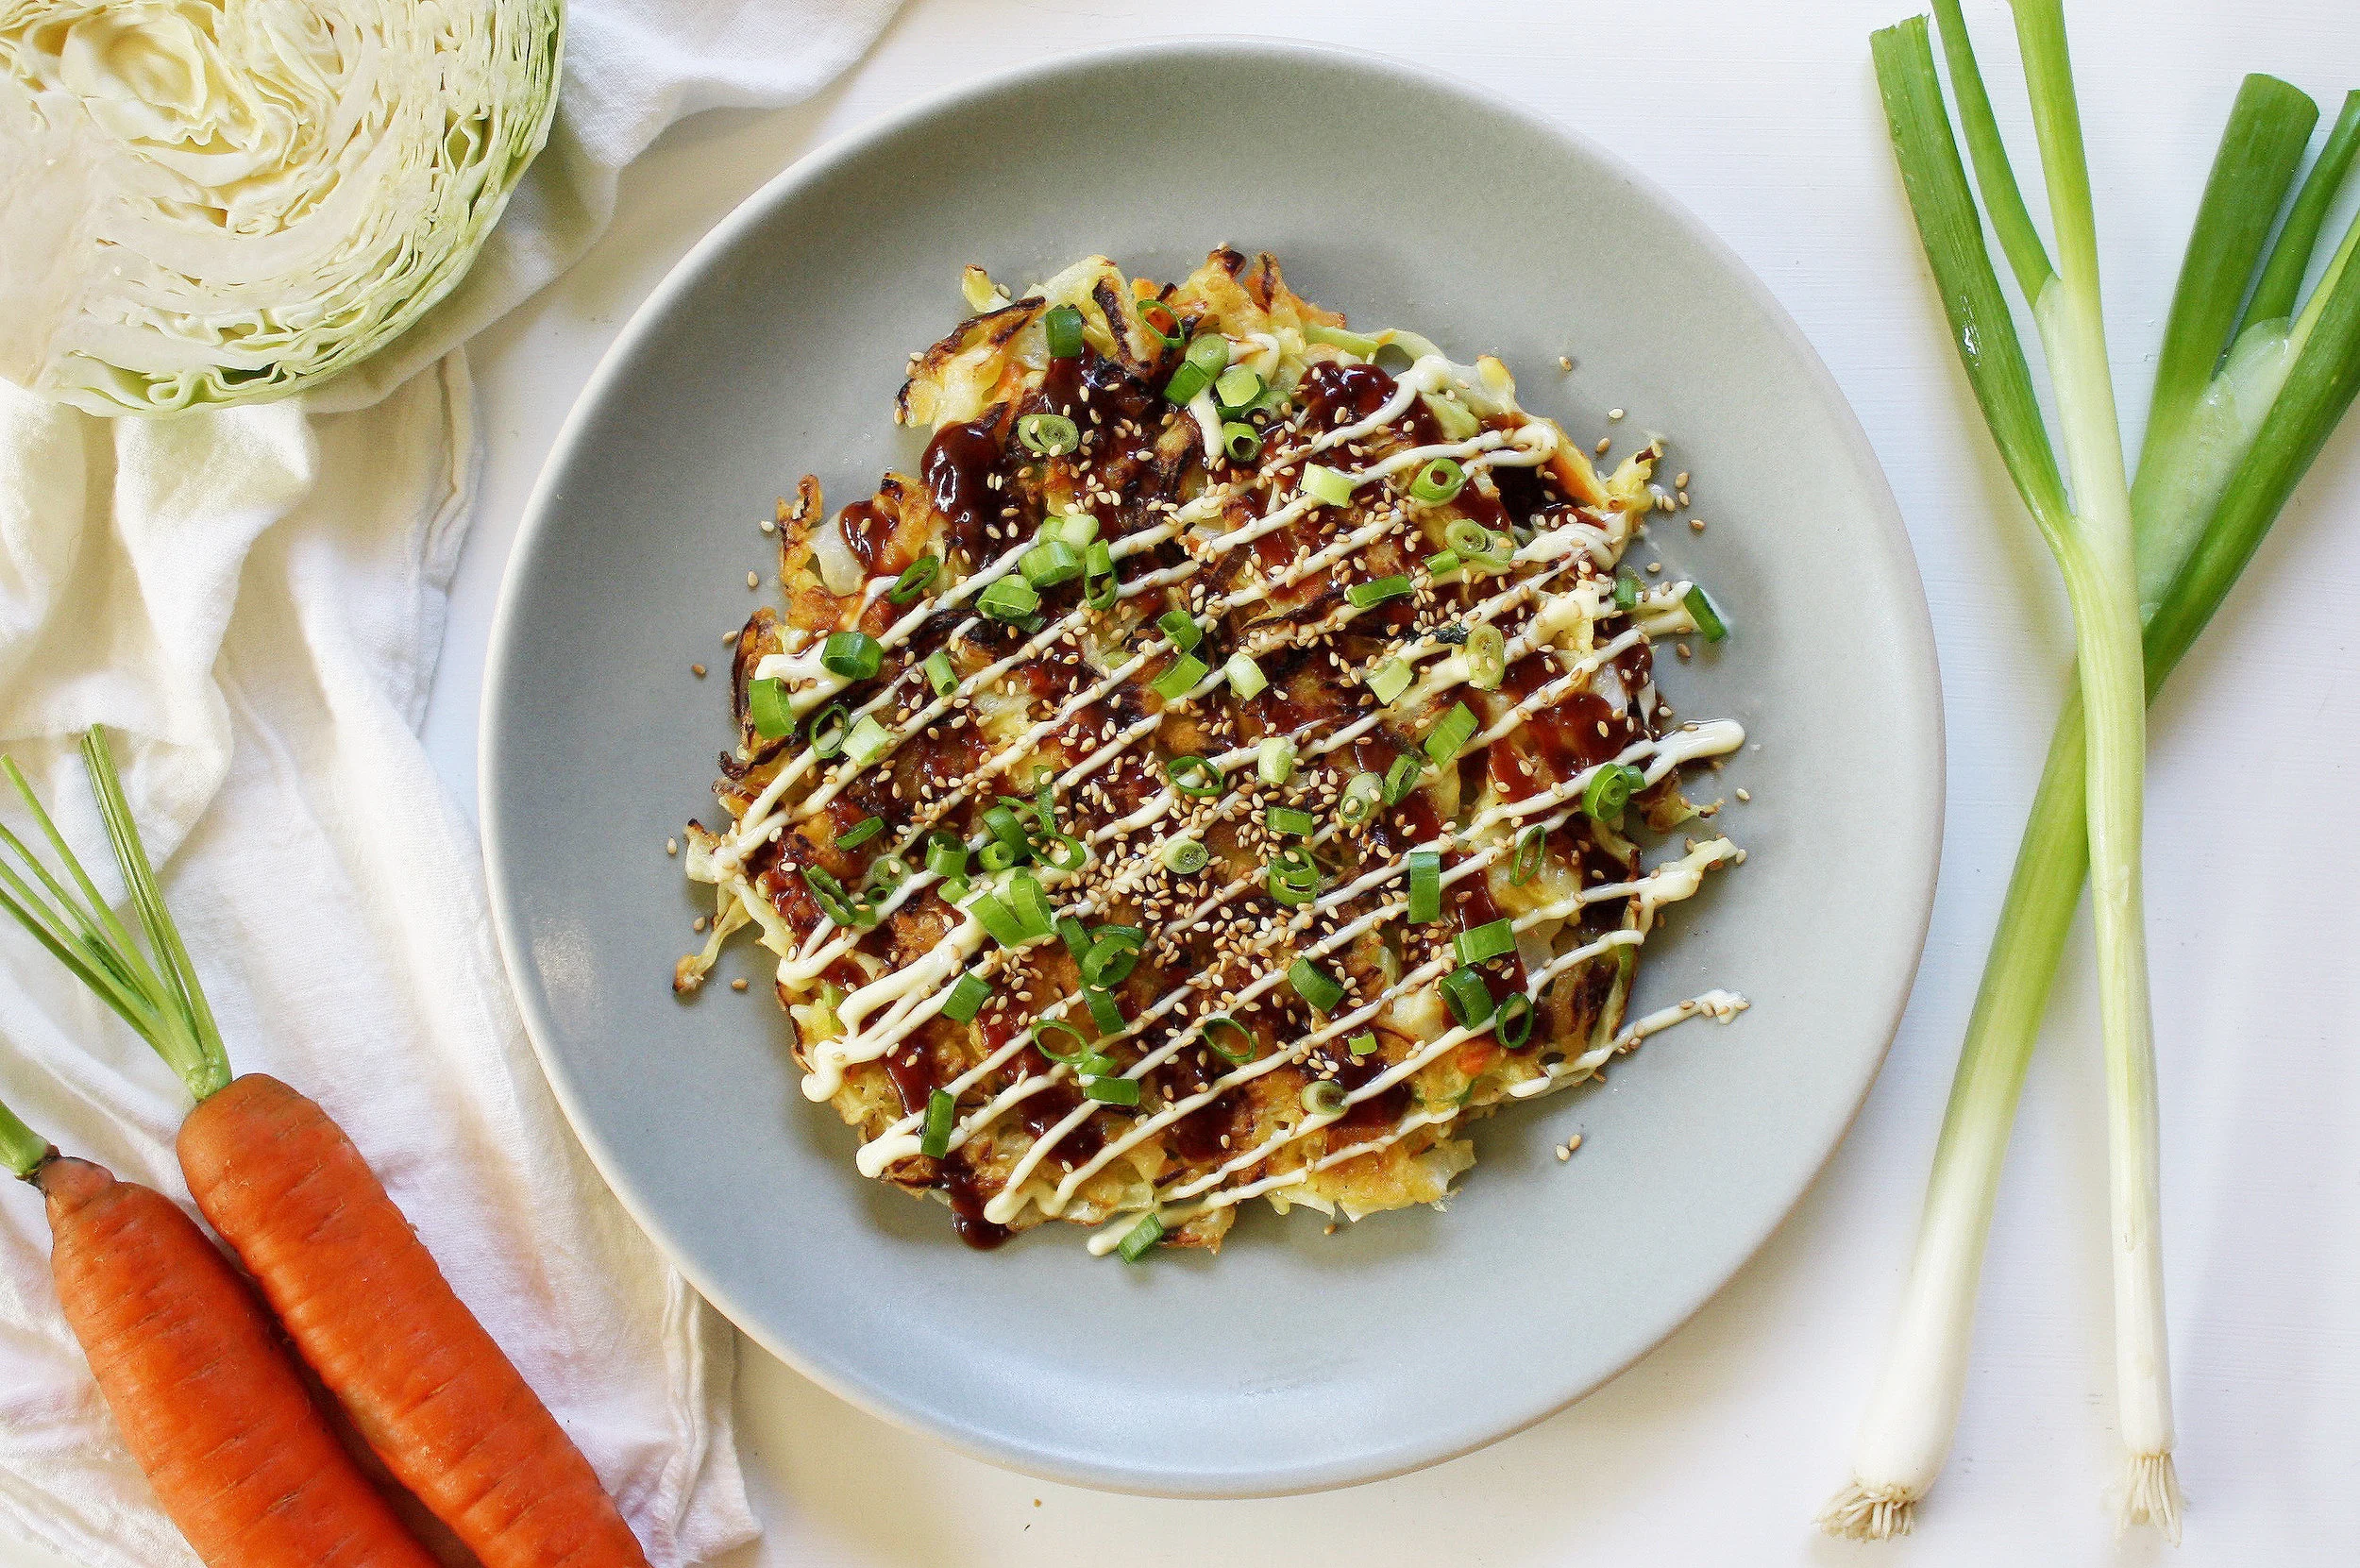
The Japanese word Okonomiyaki is derived from two words: okonomi “how you like it” and yaki “grill.” Okonomiyaki is a customizable Japanese savory vegetable pancake. Like a latke, it gets cooked in oil in a fritter formation. Unlike a latke, it’s usually made into a large plate-sized pancake comprised mainly of cabbage. Food historians have linked the rise in popularity of okonomiyaki in Japan to World War II, when rice was more scarce and this recipe offered a filling meal or snack with a wheat-based starch. Throughout Japan there are regional differences and countless variations of okonomiyaki, but the most common form of the dish involves a batter made of flour, a variety of mountain yam, eggs, shredded cabbage, green onion, dashi, and often the addition of pork belly. It gets topped with its own tangy sweet sauce, Japanese mayonnaise, and bonito flakes (katsuobushi).

I first fell in love with okonomiyaki on a trip to Japan. You can find it there in restaurants that specialize in the dish, but it’s also something that is prepared in home kitchens. The cabbage gets slightly crisp, tender and sweet when seared in oil on a flattop or skillet, and then it gets generously slathered with an umami rich sauce, along with a welcome drizzle of creamy mayo. The richness, sweetness, and tanginess of these components all work perfectly together. A few months after I got back from Japan, I ended up eating at Brooklyn’s Japanese Jewish restaurant, Shalom Japan. I didn’t hesitate to order their Jewish-influenced spin on okonomiyaki. They’re known to top it with pastrami, or even corned lamb tongue and sauerkraut. It became clear there that okonomiyaki is a perfect fit on a Jewish table with its base of humble cabbage and onion. The fried pancake part of it all called out “Hanukkah.”

I am a fan of all pancakes and fritters, and I set out to modify the classic Japanese version for a recipe that didn’t require access to a specialty food store, and that could be made with kosher ingredients. Full disclosure: my version lacks authenticity. If you’re going for the real deal you’ll need a batter made with an okonomiyaki flour mix, or nagaimo yam; this special kind of yam is added in powdered form to the flour mix, or gets grated fresh into the batter. The toppings should include bonito flakes, and the batter should be made with dashi. These ingredients can be found at most Japanese markets. Instead of nagaimo yam, my version uses a batter of flour and potato starch, and instead of dashi I use water. I’ve also included a recipe for homemade traditional okonomiyaki sauce that can be made simply with easy to find ingredients, but you can also buy premade bottled sauce. You can make these pancakes large-sized and cut into wedges like the Japanese do, or slightly smaller à la a large latke. I wouldn’t go too small with this, as the vegetables tend to hold together better en masse. This recipe doesn’t need to be too exact and it works as a blank canvas for additional vegetables like kale, mushrooms, and/or daikon. In the spirit of Hanukkah, these okonomiyaki get cooked in oil, but they’re not heavily fried. The oil used to fry the Okonomiyaki gives a loving nod to the miracle of the oil glowing for eight days instead of one in the Temple, but the heap of vegetables and addictive sauce make this a nutritious and satisfying addition to any Hanukkah meal.

ingredientshotokonomiyaki.jpg

Okonomiyaki for Hanukkah

Serves 4

Ingredients:

For the pancakes-

  • ¾ cup all purpose flour or gluten free all purpose mix
  • ¼ cup potato starch or cornstarch
  • 1 teaspoon baking powder
  • 1 teaspoon kosher salt
  • 2 large eggs
  • ½-¾ cup water
  • ½ green cabbage, about 4½ packed cups
  • 3 green onions, sliced thin plus more for garnish if desired
  • 1 carrot, peeled and shredded
  • 4-5 inches daikon, peeled and shredded (optional)
  • Oil as needed (i.e. sunflower, canola, or peanut)
  • Sesame seeds, for topping (optional)
  • Mayonnaise, for topping (optional)

For the okonomiyaki sauce-

  • ½ cup ketchup
  • ¼ cup Worcestershire sauce
  • 2 Tablespoons soy sauce
  • 2 Tablespoons honey or agave syrup, or to taste
cutvegetables.jpg

Directions:

  1. Start by making the batter. Whisk together the flour, starch, baking powder and salt in a large bowl.
  2. In a separate bowl beat the eggs. Add the eggs and ½ a cup of water to the flour mixture. Whisk until smooth. You want a fairly thin, crepe batter-like consistency. If you find it too thick, add another ¼ cup of water. Try not to overmix, you do not want to overdevelop the gluten. Allow the batter to rest in the fridge for 30 minutes to an hour.
  3. While the batter is resting, prepare the vegetables. Take out the thick core from the cabbage half, then cut the halved cabbage in two. Thinly slice or shred the cabbage. Thinly slice the green onions. Grate the carrot and daikon if using.
  4. Make the okonomiyaki sauce: combine the ketchup, Worcestershire, soy sauce, and honey/agave in a bowl. Taste and adjust to your liking. The sauce should be tangy, savory, and a little sweet.
  5. Combine the batter with the vegetable mixture.
  6. Heat a cast iron skillet or a nonstick-skillet with about 3 tablespoons of oil over high heat. Once the oil is glistening and hot lower the heat to medium low, and, add some of the cabbage mixture to the pan, gently nudge it into a circle shape. I like to make each pancake with about 2 cups of the mixture. For me, that makes an ideal sized pancake that isn’t too hard to flip, and one that will hold together. Cover the skillet with a lid for 3-4 minutes. Carefully flip over the pancake, and cover it with a lid for an additional 3-4 minutes, or until browned on both sides and cooked through. Make sure not to cook on too high of a heat or the pancake might burn while remaining raw in the center.
  7. Serve hot topped with a generous spread of the okonomiyaki sauce, mayo if desired, sliced green onions and sesame seeds.
  8. Slice and serve!
2closeupokonomiyaki_secondaryphoto.jpg
In Dinner, Lunch, Vegetarian Tags Hanukkah, Okonomiyaki, Kosher food, kosher, jewish food, japanese food
Comment
SquashOnionBurekas_favorite.jpg

Butternut Squash and Caramelized Onion Burekas

November 20, 2017

This is a seasonal twist on classic burekas that I wrote up for alma. (check out their site for the full article). The caramelized onions are the key ingredient in this dish; they always take longer than you think to caramelize, but the resulting flavor is worth the work. This makes a great side, appetizer, or snack during the holidays. 

Butternut Squash and Caramelized Onion Burekas

Makes 24 burekas

INGREDIENTS

  • 2 sheets puff pastry (10” x 15”), defrosted in the refrigerator overnight
  • 1½ lbs. butternut squash (1 large squash), halved lengthwise and seeds removed
  • 1 large yellow onion, medium diced
  • 2 tablespoons olive oil or butter
  • 1 big fat clove of garlic or 2 medium-sized, minced fine
  • 1 teaspoon ground coriander
  • 2-3 sprigs thyme, leaves removed from stems
  • Pinch of cayenne pepper
  • Salt and pepper, to taste
  • 1 large egg yolk
  • Black and/or white sesame seeds, to garnish

DIRECTIONS

Preheat the oven to 375°F.

Drizzle the halved butternut squash with oil, then place it cut-side down on a sheet pan. You don’t need to peel the squash. Roast until the squash is fully cooked and tender, about 35-45 minutes.

roastedsquash.jpg

While the squash is baking, caramelize your onion by putting a few tablespoons of butter with a drizzle of olive oil in a sauté pan over medium low heat. If keeping the dish non-dairy, use just olive oil. Add the diced onion to the pan, and sauté over low or medium low heat until starting to soften, about 5 minutes. Season with a generous pinch of salt and then continue to let the onion cook and caramelize, stirring occasionally so the onion doesn’t burn; make sure to keep the heat fairly low. This is where patience comes in, beautiful caramelized onions can take 30-45 minutes to make. You want your onions golden and sweet, you don’t need to caramelize them until they’re a deep brown. This is a good tutorial if you need it.

Add the minced garlic to the caramelized onions, and sauté for another 2-3 minutes or until the garlic is fragrant but not at all browned. Turn off the heat.

caramelizedonions.jpg

Once the squash is cooked and slightly cooled, scoop the inside of the squash into a bowl and discard the peel. Add the caramelized onion to the squash. Mix together. The mixture should be soft and not too lumpy.

Mix in the ground coriander, thyme, and cayenne. Taste, and then season with salt and pepper as desired. Allow the squash mixture to cool before assembling the burekas. You can make this filling up to two days in advance and store in the fridge.

To assemble the burekas: roll out a sheet of puff pastry until rectangular and just slightly thinner than when it comes out of the package. Divide the dough into 12 squares: cut the dough in half widthwise, and then cut each half into half again. Next, cut the dough into thirds lengthwise. Put a spoonful of the filling into each square. Fold over the dough to form a triangle shape, and press the edges together. There’s no need to crimp or press too hard, the filling will stay put, and you want to ensure there are layers of flaky pastry.

processshotofburekas.jpg

Transfer the formed triangular burekas onto a baking sheet, place each bureka about an inch apart, 12 will fit on each baking sheet. At this point, you can freeze the burekas and reserve them for when you’re ready to bake.

Before baking, combine the large egg yolk with a small splash of water. Beat well. Brush the tops of the burekas with the egg wash. Sprinkle with sesame seeds.

formedburekasprebaking.jpg

Bake for 20-25 minutes, or until golden brown and flaky. Transfer to a wire baking rack, and allow to cool for at least 10 minutes before serving. Burekas are best served warm or at room temperature.

squashburekassecondaryphoto.jpg
In Holiday, Dinner, Lunch, Appetizer Tags jewish food, kosher, burekas, squash burekas, caramelized onion, appetizer, holiday food, thanksgiving, thanksgiving food, jewish thanksgiving, pastry, homemade, baked goods
Comment
allthreedishes.jpg

Recipes for Tu B'av - for .alma magazine

August 3, 2017

My article with recipes for Tu B'av (the Jewish Day of Love) is up on .alma right now!

Below is the dish that I can't stop eating right now. It's more of a recommendation than a recipe - which is my favorite kind of dish to make. And is there anything better than tomatoes in August? They help me get through the dog days of summer here in Los Angeles. You need so little to make them good. And in my humble opinion, beautiful sweet tomatoes, heavily salted, on crisp good bread with excellent butter is incredibly romantic. Enjoy!

Tomato Thyme Toasts

Serves 8-10

  • Baguette or small loaf of good crusty bread, cut into ¾” slices
  • 2 lbs. of your favorite tomatoes
  • 6-7 fresh thyme sprigs, leaves removed from stem
  • Butter (splurge on some good stuff)
  • Maldon salt or kosher salt, to taste
  • Good extra virgin olive oil, to taste

Preheat the oven to 375°F.

Slice the tomatoes into rounds, just under ½” thick. Lightly salt the tomato slices. The salt will start to soften the tomatoes and season them all the way through.

Place the bread slices on a baking sheet. Drizzle lightly with olive oil. Bake the bread for 6-8 minutes, or until just toasted and beginning to brown on the edges. Once the bread is toasted, spread butter onto each piece. This dish is all about layering of fats and salt with the tomatoes.

Top the toasts with the tomato slices. Top the tomato slices with thyme leaves. Drizzle with a little more olive oil (for a little more oomph). Sprinkle Maldon salt over everything – this will add a nice salty crunch.

You can bake the toasts ahead of time and assemble them with tomatoes when you’re ready to serve, the bread doesn’t have to be hot, and the tomatoes will mellow out the bread’s crunch.

______________________________________________________________________

In Lunch, Holiday, Appetizer Tags jewish holiday, jewish food, kosher, tu b'av, holiday, holiday food, romantic food, tomato toast
Comment

Beet Cured Gravlax

February 13, 2017

Making homemade gravlax is easy. It's one of those great recipes that impresses guests, looks beautiful, requires zero cooking, and takes minutes to make. Heads up: while this recipe is easy, you need to prepare it 3 days in advance.

The beets create a lovely deep scarlet color on the top layer of the fish, and they add a very subtle sweet, earthy, flavor. 

I love to serve this thinly sliced on a platter with fresh veggies. Bagels and cream cheese are always welcome accompaniments for cured fish. Enjoy!

Beet Cured Gravlax

  • 3 lb center-cut salmon filet, as thick as possible 

  • 2 medium red beets (about 1 pound), peeled and finely grated

  • 1 large bunch fresh dill, roughly chopped

  • Zest of 1 large orange

  • Zest of 2 lemons

  • 1 cup plus 2 Tablespoons kosher salt 

  • ½ cup granulated sugar

  • ¼ cup freshly cracked pepper

Note: Ideally, your filet is at least 1½-2” thick, and evenly thick across the fish. If you have thinner parts of a large filet, they may be too salty once cured, and you can discard those ends. Make sure all of the bones are removed from the salmon. 

Directions:
In a bowl, combine the grated beets with chopped dill, orange zest, lemon zest, salt, sugar, and pepper. 

Place a large piece of plastic wrap big enough to cover the fish on the bottom of a non-metal dish (pyrex or ceramic). Place half of the beet mixture on the bottom. Place the salmon skin-side down, and then rub the rest of the beet mixture on top. Tightly wrap the salmon in the plastic wrap. Place another pan/dish on top of the salmon and weigh it down (something like canned goods or small weights works well).

Cure for 3-4 days, or until the salmon is significantly firmer to the touch. Each day, flip the salmon over and drain any excess liquid. Once fully cured, scrape off the beet mixture and discard. 

Serve thinly sliced with the accompaniments of your choice. Cured salmon will keep wrapped tightly in the fridge for up to one week. 

In Dinner, Holiday, Lunch, Appetizer Tags salmon, lox, gravlax, bagels, kosher
Comment

Latest

Featured
IMG_3606.jpeg
May 27, 2025
Sheet-pan Lemony Potatoes and Baby Artichokes
May 27, 2025
May 27, 2025
IMG_3784.jpeg
May 12, 2025
The Secret to Crispy Tofu Every Time + A Sweet & Spicy Gochujang Glaze
May 12, 2025
May 12, 2025
snackingcakeslices copy.jpg
Apr 11, 2025
One-bowl blueberry lemon snacking cake (gluten-free/grain-free)
Apr 11, 2025
Apr 11, 2025
IMG_5075.JPG
Feb 24, 2025
Manti (meat dumplings) in brothy tomato sauce
Feb 24, 2025
Feb 24, 2025
matzoballsontablecloth.jpg
Jan 20, 2025
Golden Chicken Soup with Matzo Balls
Jan 20, 2025
Jan 20, 2025
harissatofuandchickpeas.jpg
Dec 18, 2024
Sheet-Pan Crispy Harissa Tofu, Chickpeas, and Broccolini
Dec 18, 2024
Dec 18, 2024
caracaracake.jpg
Dec 4, 2024
Cara Cara Orange Olive Oil Cake
Dec 4, 2024
Dec 4, 2024
IMG_0640.JPG
Nov 6, 2024
Easy Roast Turkey for Thanksgiving
Nov 6, 2024
Nov 6, 2024
IMG_3282.JPG
Sep 19, 2024
Apple and Honey Dumplings
Sep 19, 2024
Sep 19, 2024
IMG_7173.jpeg
Jul 31, 2024
Galette with any kind of fruit
Jul 31, 2024
Jul 31, 2024
IMG_4004.jpeg
May 9, 2024
Cheddar Cheese Coin Crackers
May 9, 2024
May 9, 2024
DSC02602.JPG
May 2, 2024
Asparagus, Gruyere & Swiss Tart
May 2, 2024
May 2, 2024
whitebeansoupwithzhug.JPG
Mar 11, 2024
Yemenite White Bean Soup with Zhoug
Mar 11, 2024
Mar 11, 2024
DSC02301 (1).jpeg
Jan 24, 2024
Celery, kohlrabi, date salad with toasted almond and sesame
Jan 24, 2024
Jan 24, 2024
DSC02138.jpg
Dec 3, 2023
Sweet potato latkes with cranberry salsa
Dec 3, 2023
Dec 3, 2023
kompot_main photo.JPG
Jul 11, 2023
Ukrainian Summer Fruit Kompot
Jul 11, 2023
Jul 11, 2023
cherryvareniki mainphoto.jpg
Jun 15, 2023
Cherry Vareniki
Jun 15, 2023
Jun 15, 2023
tzimmescaketopdown.jpg
Apr 19, 2023
One-Bowl Tzimmes Cake
Apr 19, 2023
Apr 19, 2023

Sign up with your name and email address to join my mailing list.

I respect your privacy.

Thank you!

Privacy Policy can be found here

All photos copyright of Sonya Sanford unless otherwise indicated